Integrating GitLab
This guide will show you how you can set up GitLab to automatically build container images and update your deployment in OpenShift.
Warning
The TU Wien GitLab container registry currently does not work with OpenShift. This guide will use Harbor for storing container images instead.
Step 1: Setting up Harbor
In order for GitLab to push to Harbor, GitLab needs permissions to do so. You can accomplish that by creating a robot account in Harbor.
Head to Harbor and select your project. On the top click Robot Accounts and
create a new robot account. This account should have the following settings:
- Expiration time:
Never - Permissions:
- List Repository
- Pull Repository
- Push Repository
- Read Artifact
- List Artfiact
- Delete Artifact
- Create Tag
- Delete Tag
- List Tag
It should look something like this:
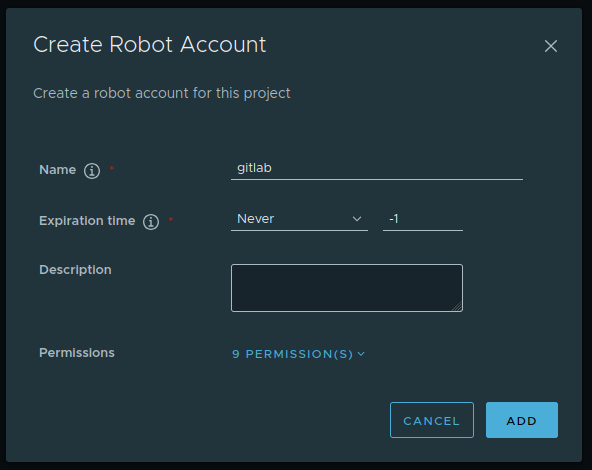
Click Add and copy the username and password on the next screen to a safe location. We will need these in the next
step.
Note
Depending on your security requirements, you may want to rotate your keys frequently.
Step 2: Enabling CI/CD in GitLab
By default, the CI/CD functionality in GitLab is disabled. Open your project and head to Settings → General and
open the Visibility, project features, permissions section. Enable the CI/CD option. Don't forget to click Save
below.
Next, go to Settings → CI/CD and open the Runners section. Enable the
Turn on instance runners for this project option.
Step 3: Setting up the Harbor credentials
Now you can open up the Variables section on the same screen as above and create four CI/CD variables with the
following settings:
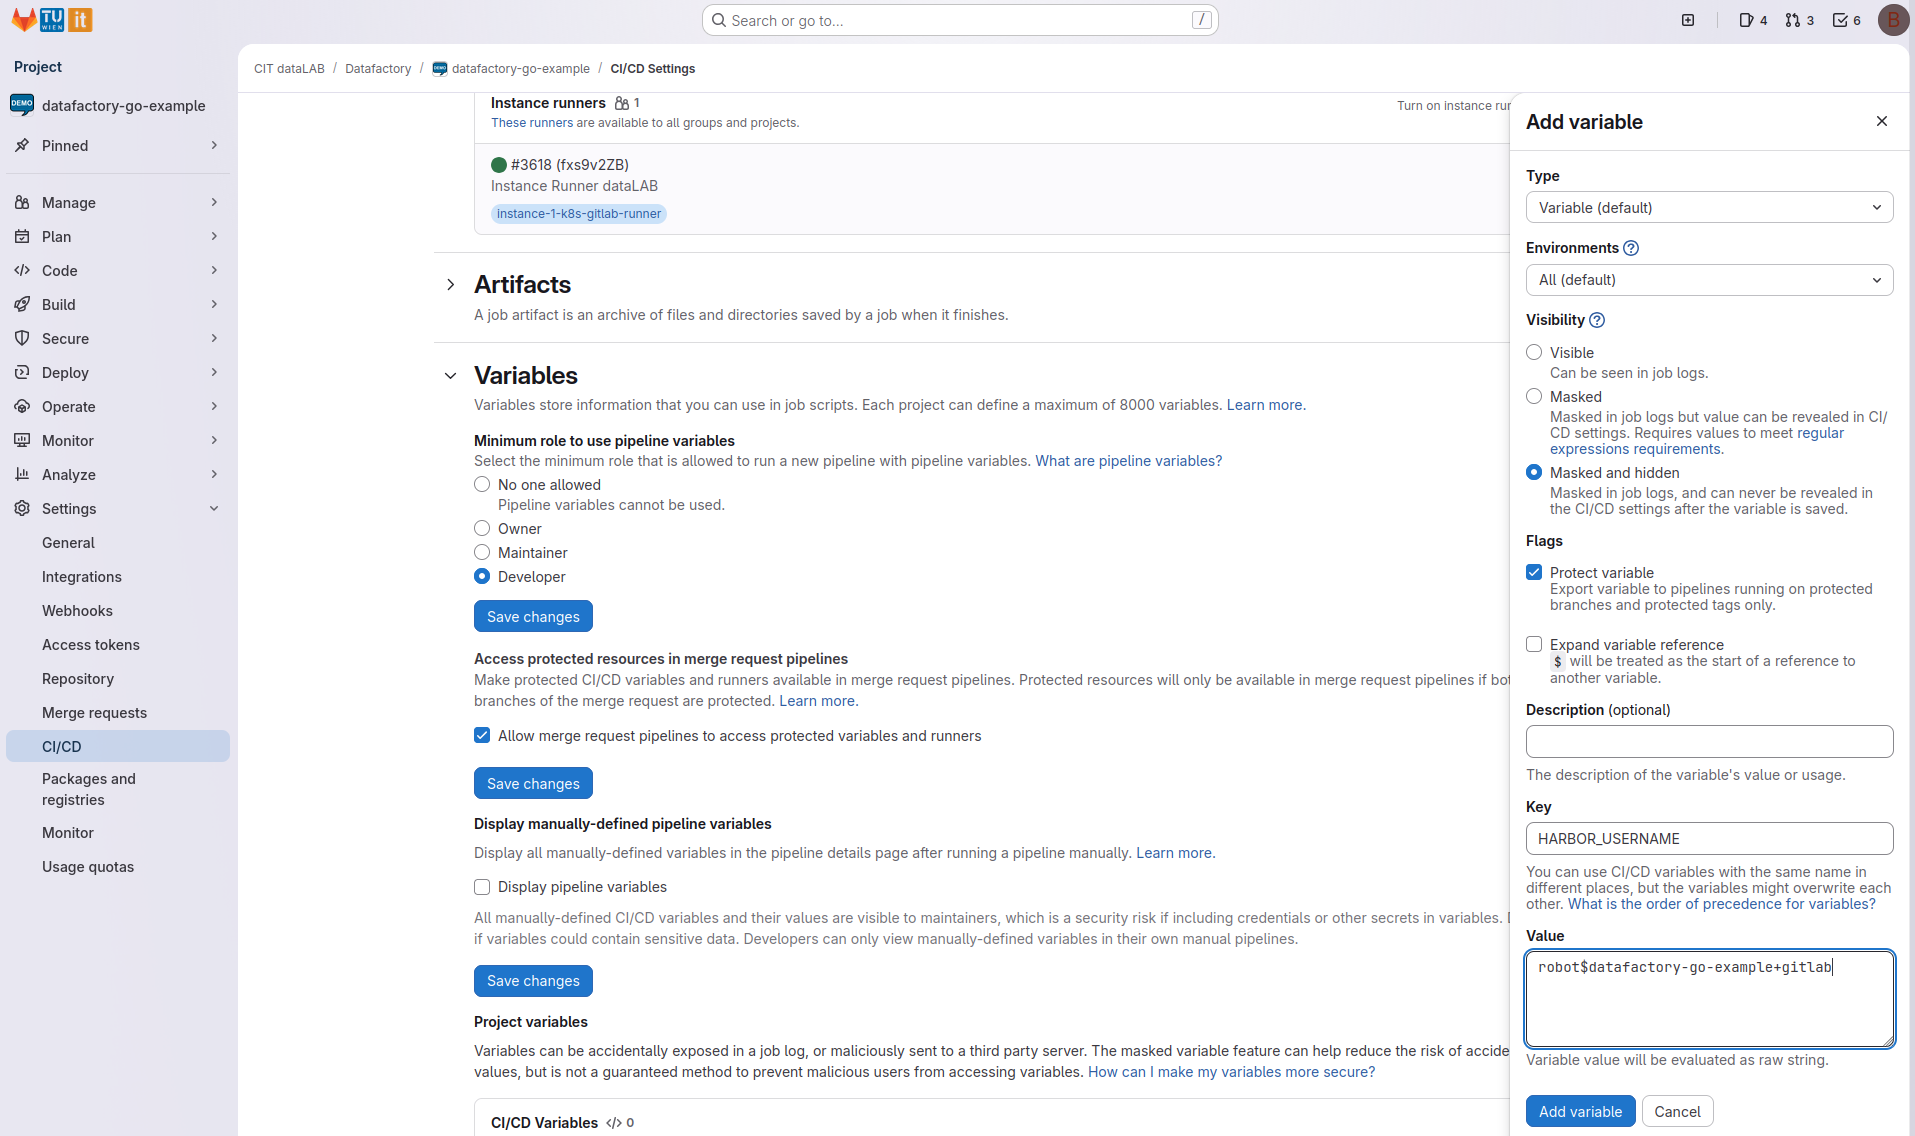
The first variable:
- Visibility: Masked and hidden
- Protect variable: yes
- Key:
HARBOR_USERNAME - Value:
robot$your-harbor-robot-account
It should look roughly like this:
And the second:
- Visibility: Masked and hidden
- Protect variable: yes
- Key:
HARBOR_PASSWORD - Value:
your-super-secret-harbor-password
The third:
- Visibility: Visible
- Protect variable: no
- Key:
HARBOR_ADDRESS - Value:
registry.datalab.tuwien.ac.at
Finally, the fourth:
- Visibility: Visible
- Protect variable: no
- Key:
HARBOR_REPOSITORY - Value:
your-harbor-project/your-repository
Step 3: Creating protected tags
As we have set our variables as protected, they will only be exposed to CI/CD workflows that run correctly on protected
branches and tags. This means you will need to create a protected tag setup for your repository. To do this, head to
Settings → Repository and set up Protected tags to match your tag names.
Step 4: Pushing to Harbor
Now you are ready to automatically push to Harbor every time you build. Since the GitLab runner is unprivileged, we will need to use one of the rootless modes.
First, we will create a .gitlab-ci.yml containing the following build step:
build:
  image:
    name: moby/buildkit:rootless
    entrypoint: [""]
  only:
    - tags
  except:
    - branches
  stage: build
  variables:
    BUILDKITD_FLAGS: --oci-worker-no-process-sandbox
  before_script:
    - mkdir -p ~/.docker
    - echo "{\"auths\":{\"$HARBOR_ADDRESS\":{\"username\":\"$HARBOR_USERNAME\",\"password\":\"$HARBOR_PASSWORD\"}}}" > ~/.docker/config.json
  script:
    - |
      # Build with daemonless, see https://docs.gitlab.com/ci/docker/using_buildkit/ for details:
      buildctl-daemonless.sh build \
        --frontend dockerfile.v0 \
        --local context=. \
        --local dockerfile=. \
        --output type=image,name=$HARBOR_ADDRESS/$HARBOR_REPOSITORY:$CI_COMMIT_TAG,push=true
Note
As you may notice, this job only runs when you create a git tag. This way, your container images will have
well-defined versions, which has two benefits:
1. OpenShift will not try to pull the image if it already has it.
2. You can easily go back to the previous version with oc rollout undo.
Step 5: Granting GitLab permissions to OpenShift
So far you have only pushed the container image, but you haven't told OpenShift that it should actually use it.
Note
Before you proceed with this step, please set up OpenShift to pull from Harbor.
We need to give GitLab permissions to perform a rollout on your project. This involves creating a service account, which you can do with the CLI using the following command:
oc create sa gitlab
The service account alone will not grant enough permissions, so you will have to link it to the edit role in your project. The edit role allows the creation and update of Deployments and other application ressources.
oc create rolebinding gitlab \
   --clusterrole=edit \
   --serviceaccount project-YOUR-PROJECT-NAME:gitlab
Finally, you will need to create a secret for the service account. For this example we will create a token that expires in 10 years, but for high security projects you may want to rotate your tokens frequently.
oc create token gitlab --duration=87600h
Step 6: Setting up automatic rollouts
As before, we will set up two variables in GitLab under Settings → CI/CD → Variables:
- Visibility: Masked and hidden
- Protect variable: yes
- Key:
OPENSHIFT_TOKEN - Value:
your-token-here
- Visibility: Visible
- Protect variable: no
- Key:
OPENSHIFT_SERVER - Value:
https://api.datalab.unicloud.at:6443
- Visibility: Visible
- Protect variable: no
- Key:
OPENSHIFT_DOWNLOAD_SERVER - Value:
https://downloads.apps.datalab.unicloud.at
Now you can modify your .gitlab-ci.yml to include a deployment step, which triggers the rollout. Depending on how you
manage your manifests, there are different options.
Option 1: Pre-deployed Kubernetes manifests
This is useful, if you have already applied your Kubernetes manifests to the cluster and simply want to update the
deployment. We use oc patch deployment to modify the deployment and point to the new image.
deploy:
  image:
    name: debian:stable-slim
  only:
    - tags
  except:
    - branches
  stage: deploy
  needs:
    - build
  before_script:
    - apt update
    - apt install -y wget
    - wget $OPENSHIFT_DOWNLOAD_SERVER/amd64/linux/oc.tar
    - tar -xvf oc.tar
  script:
    - ./oc login --token="$OPENSHIFT_TOKEN" --server="$OPENSHIFT_SERVER"
    - ./oc patch deployment your-deployment -p '{"spec":{"template":{"spec":{"containers":["name": "your-container-name", "image":"$HARBOR_ADDRESS/$HARBOR_REPOSITORY:$CI_COMMIT_TAG"]}}}}'
Option 2: Kustomize
Kustomize is a built-in tool that lets you apply simple manifests with partial overrides.
You will need to create your manifests in a folder (e.g. kubernetes) and then add a kustomization.yaml file to it
with a content such as this:
resources:
  - deployment.yaml
  - service.yaml
  - route.yaml
Note, that your deployment should use a fake container image name, we'll replace it from the pipeline. You can now
add a deploy step to your .gitlab-ci.yml file with the following content:
deploy:
  image:
    name: debian:stable-slim
  only:
    - tags
  except:
    - branches
  stage: deploy
  needs:
    - build
  before_script:
    - apt update
    - apt install -y wget
    - wget $OPENSHIFT_DOWNLOAD_SERVER/amd64/linux/oc.tar
    - tar -xvf oc.tar
  script:
    - ./oc login --token="$OPENSHIFT_TOKEN" --server="$OPENSHIFT_SERVER"
    - |
      # This is NOT the same kustomization.yaml
      # as the one in your "kubernetes" folder.
      cat <<EOF >kustomization.yaml
      resources:
        # This points to your folder with the Kubernetes manifests:
      - kubernetes/
      images:
        # We replace the fake image name with the real one:
      - name: your-fake-image-name
        newName: "$HARBOR_ADDRESS/$HARBOR_REPOSITORY"
        newTag: "$CI_COMMIT_TAG"
      EOF
    # Apply the "kustomized" manifests
    - ./oc apply -k ./
If everything went well, creating a new tag should now result in a rollout of the generated image.
Tip
Looking for more elaborate examples? Our example repositories have fully working applications!